
You can install a wrist-friendly keyboard tray in 30 minutes by gathering the right tools and following key steps. Start by measuring your desk's underside clearance and marking mounting points with a template, ensuring at least 22 inches of space. Attach mounting brackets securely using the provided hardware, then connect your tray with a slight negative tilt of 15 degrees for ideal wrist positioning. Test the stability by adjusting height and angles until you achieve a natural 90-degree elbow position. Following proper ergonomic guidelines and regular maintenance will enhance your workspace comfort for years to come.
Highlights
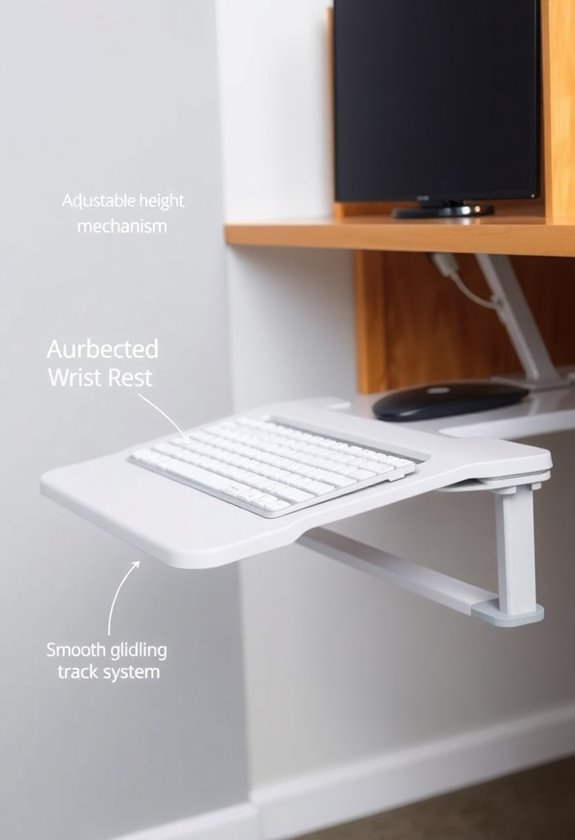
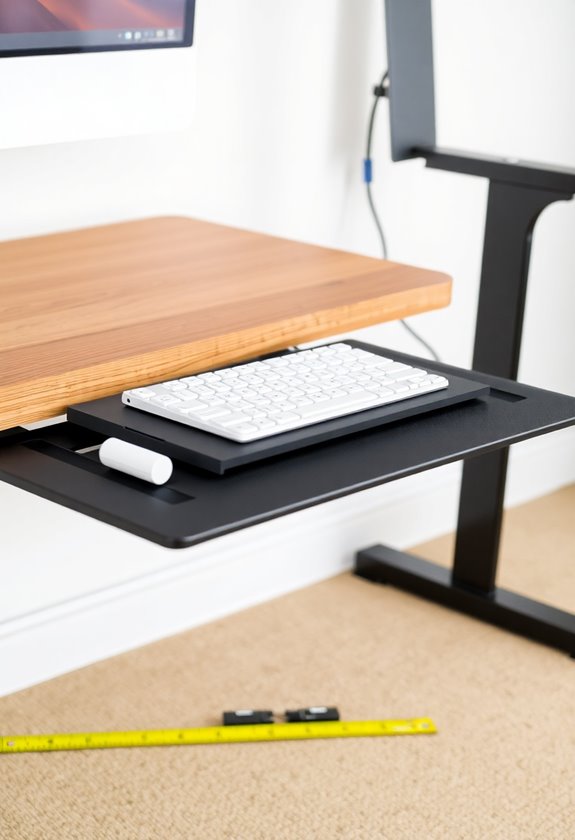
- Position the keyboard tray at a 15-degree negative tilt while sitting to maintain neutral wrist position and prevent strain.
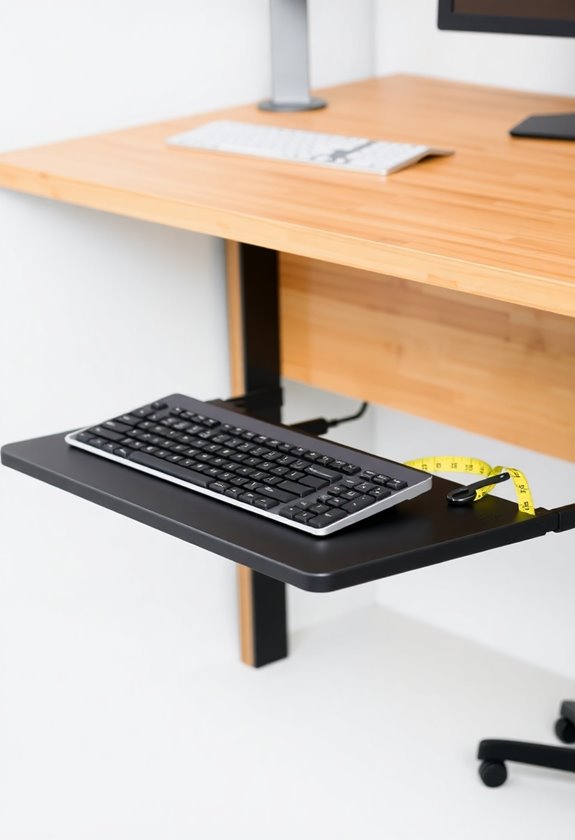
- Ensure mounting brackets are level and centered, with at least 22 inches of clearance beneath the desk for proper ergonomics.
- Install the tray at a height that maintains a 90-degree elbow angle when typing for optimal arm positioning.
- Add soft-touch wrist pads to the tray and use non-slip drawer liners to enhance comfort and stability.
- Check that the tray's mounting hardware is secure and test stability at various heights before regular use.
Understanding Keyboard Tray Benefits
Transforming your workspace with a keyboard tray can greatly improve your overall comfort and productivity at your desk. You'll find that a properly installed keyboard tray offers essential ergonomic benefits that protect your body from strain and injury during long hours of computer work. Sustained focus during tasks becomes easier with reduced physical discomfort. Ergonomic mice can further enhance your workspace comfort when paired with a keyboard tray.
Here's what you'll gain from a keyboard tray:
- You'll be able to customize height and tilt angles to match your specific body proportions
- Your wrists and arms will maintain a neutral position, reducing the risk of carpal tunnel syndrome
- You'll have better posture as the keyboard and mouse remain within your natural reach zone
- The negative tilt feature will help prevent wrist strain, with recommendations of 15° for sitting and 30° for standing
- You'll free up valuable desk space while creating a more organized work environment
Required Tools and Materials
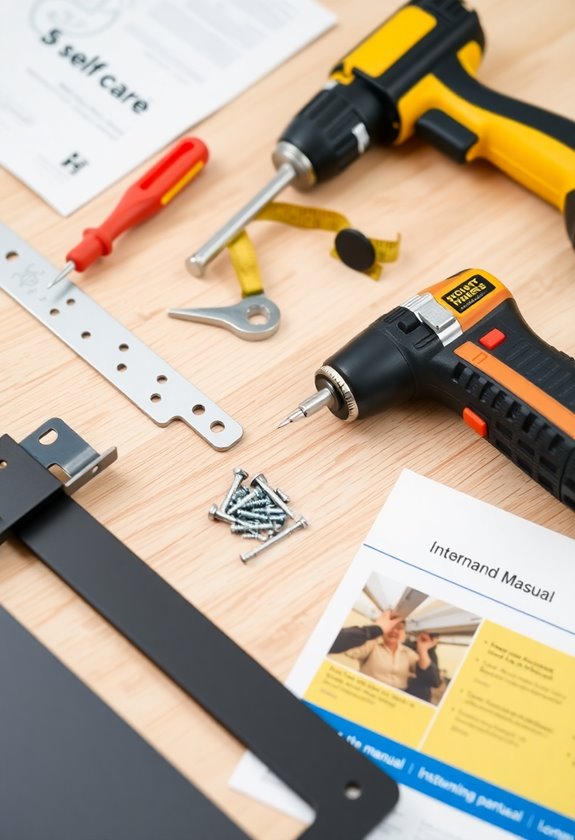
Before you begin installing your keyboard tray, gather all the necessary tools and materials to guarantee a smooth installation process. You'll need a wooden board made from pre-glued wood plank or MDF shelving, along with appropriate drawer slides and mounting hardware to secure everything in place.
A 2-10 year warranty is common for quality keyboard trays and mounting hardware. Essential tools for your installation include a worktop saw for precise cutting, a random orbital sander for smooth edges, and an electric screwdriver for efficient hardware mounting. Don't forget to gather safety equipment like protective glasses and measuring tools such as a heavy-duty tape measure and masking tape. You'll also want to have a drill with a 1/8-inch bit ready for creating pilot holes, plus wood polish to protect and enhance your finished tray's appearance.
Desk Preparation Steps
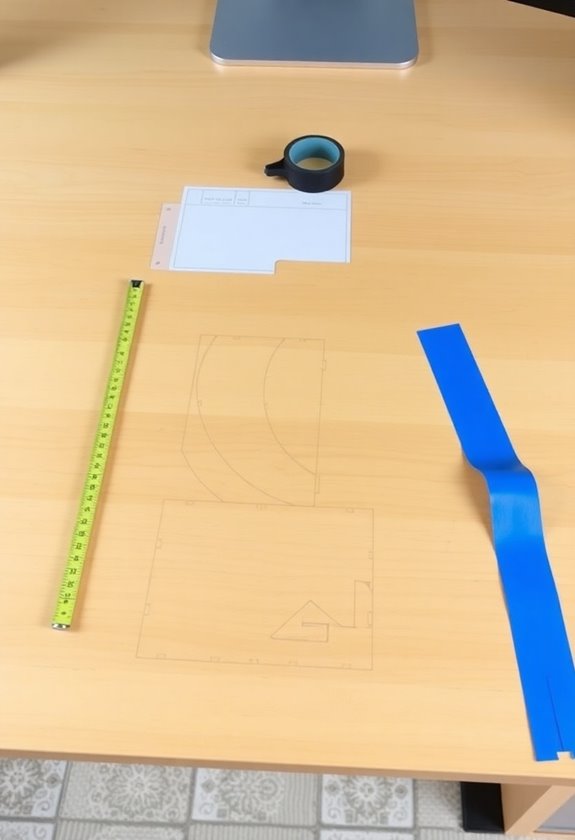
Proper desk preparation is essential for a successful keyboard tray installation. Before you begin, carefully measure your workspace dimensions, including the desk depth, width, and available height underneath to guarantee proper fit and clearance for your tray. Consider selecting a tray with soft-touch wrist pads for maximum ergonomic benefits. A wrist rest position can significantly improve typing comfort during long work sessions.
Start by cleaning the underside of your desk and marking your drilling points using a template for accuracy. You'll want to protect any soft desk surfaces with masking tape before drilling, and confirm you're centering the track or arm properly under the desk. Don't forget to reflect on ergonomic factors like neutral wrist posture and height adjustability when planning your installation points. Make sure you've planned for cable management to keep cords organized, and verify that your desk material is compatible with the mounting hardware you've selected.
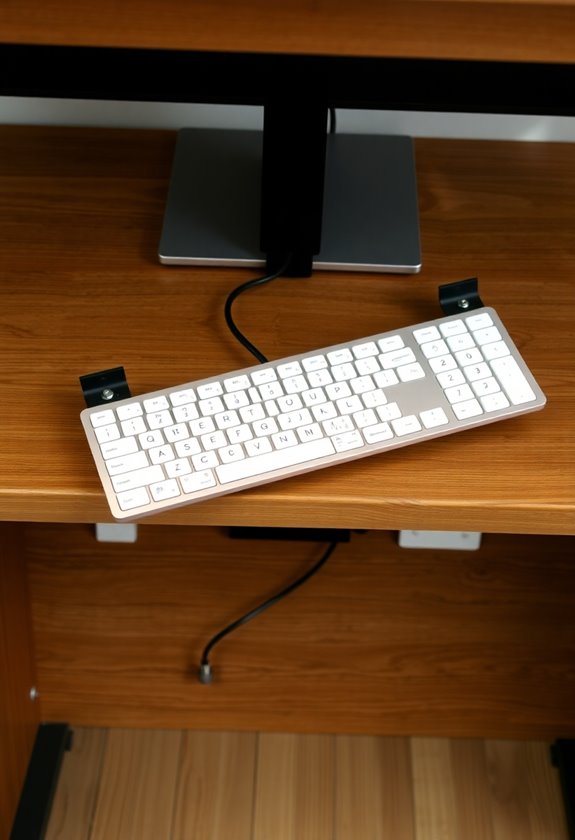
Mounting Bracket Installation
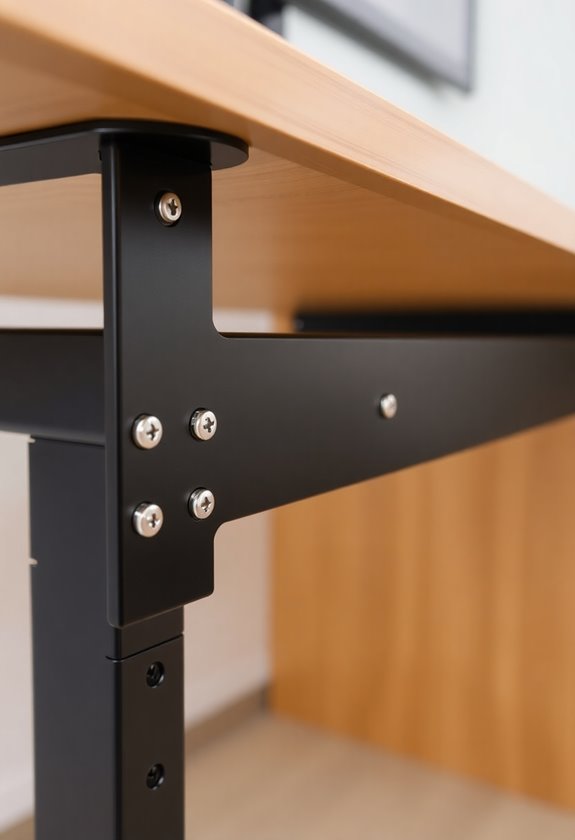
Installing mounting brackets marks the essential foundation of your keyboard tray setup. Here's how to guarantee proper installation:
- Select brackets that match your desk material and can support your keyboard tray's weight, making sure they're compatible with your specific desk design and ergonomic needs.
- Mark your installation points carefully on the desk's underside, and if you're drilling pilot holes, don't forget to wear safety glasses while working beneath the surface.
- Align the brackets precisely using a level tool, then secure them firmly with the manufacturer-provided screws, guaranteeing they're positioned at the correct height for ideal wrist comfort.
- Double-check that your brackets are completely level and allow for proper adjustments in both height and tilt, which you'll need for customizing your setup later.
Ensure you have at least 22 inches of clearance underneath your desk before beginning the installation process.
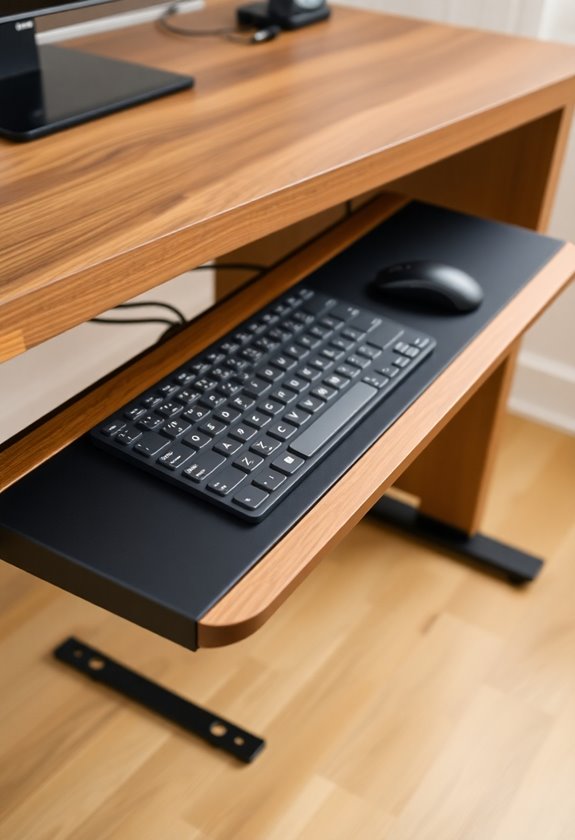
Tray Assembly Guide

The tray assembly process requires careful attention to four key components: your mounting hardware, keyboard platform, adjustment mechanisms, and essential tools. Before you begin, gather your screwdriver, measuring tape, level, and installation kit to guarantee a smooth process.
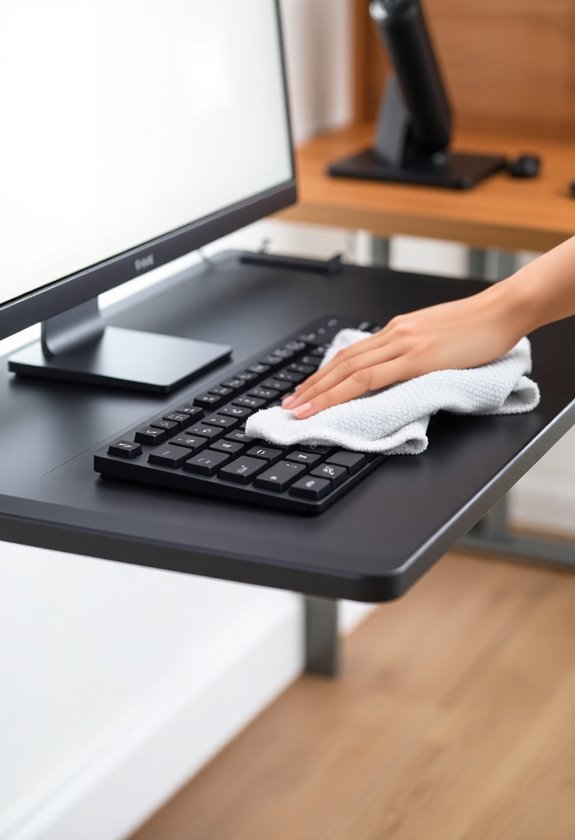
Start by measuring and marking the ideal height for your keyboard tray, keeping ergonomic guidelines in mind for optimal wrist positioning. Clear your workspace to ensure sufficient installation space. You'll want to attach the mounting brackets to your tray's underside using the provided screws, making sure they're properly aligned. Once you've secured the brackets, slide the tray onto the mounting system and verify it's both level and centered before final tightening. Don't forget to test the tray's stability and make any necessary adjustments to achieve the perfect height and angle for your typing comfort.
Positioning Your Keyboard Tray
Now that you've assembled your keyboard tray, achieving ideal positioning will make a significant impact on your comfort and productivity. Position the tray just below your elbow level, making sure your arms stay close to your sides while maintaining a 90-degree bend at the elbows.
For best ergonomic benefits, follow these essential positioning steps:
- Tilt the keyboard downward at an 11-15 degree angle away from you
- Center the keyboard directly in front of your body
- Keep the mouse and keyboard at the same level to prevent wrist strain
- Make certain there's sufficient clearance for the tray to slide smoothly
Remember to adjust your tray's height regularly to accommodate changes in posture throughout the day. You'll want to maintain proper finger positioning on the keys without bending your wrists, while keeping your arms relaxed and comfortable.
Ergonomic Height Adjustments

Proper height adjustment of your keyboard tray serves as the foundation for maintaining healthy wrists and preventing repetitive strain injuries. You'll want to position the tray so your keyboard sits at or slightly below your elbow height when you're seated or standing at your desk.
To achieve ideal ergonomic positioning, adjust your tray's negative tilt between 15 to 30 degrees, which helps maintain neutral wrist alignment while typing. Make sure your mouse platform remains level with your keyboard to prevent unnecessary reaching or awkward arm positions. If you're using a standing desk, you'll need to readjust these settings when switching positions, ensuring your keyboard tray maintains proper clearance and doesn't interfere with your knees or natural posture.
Testing Stability
Maintaining rock-solid stability in your keyboard tray guarantees comfortable typing and prevents unwanted movement that could strain your wrists. You'll want to perform these essential stability checks after installation:
- Apply pressure to different areas of the tray to test its resistance against side-to-side movement
- Verify all screws and mounting brackets are securely fastened to prevent wobbling
- Test the tray's stability at various height and angle adjustments
- Check that tracks are properly aligned and moving smoothly without catching
Once you've confirmed basic stability, enhance your setup with non-slip drawer liners or rubber feet for added traction. You should also regularly inspect the tracks, sliders, and mounting hardware for signs of wear, as these components directly impact your tray's long-term stability and performance.
Mouse Pad Integration
Seamless mouse pad integration transforms your keyboard tray into a complete ergonomic workstation. You'll need to verify your mouse pad matches your tray's dimensions and provides a stable, non-slip surface for precise cursor control.
- Position your mouse pad on your preferred side (left or right), making sure it's firmly secured to prevent unwanted movement during use.
- Select a mouse pad with built-in wrist support to maintain neutral wrist positioning while you work, which helps reduce strain over extended periods.
- Consider a pad with cable management features to keep your mouse cord organized and prevent tangling or interference with your movements.
- Adjust your mouse pad's height and tilt to align with your keyboard, verifying your elbow maintains a 90-degree angle for ideal ergonomic positioning.
For maximum comfort during extended work sessions, pair your setup with adjustable footrests to promote proper posture and circulation throughout your legs.
Monitor Height Alignment
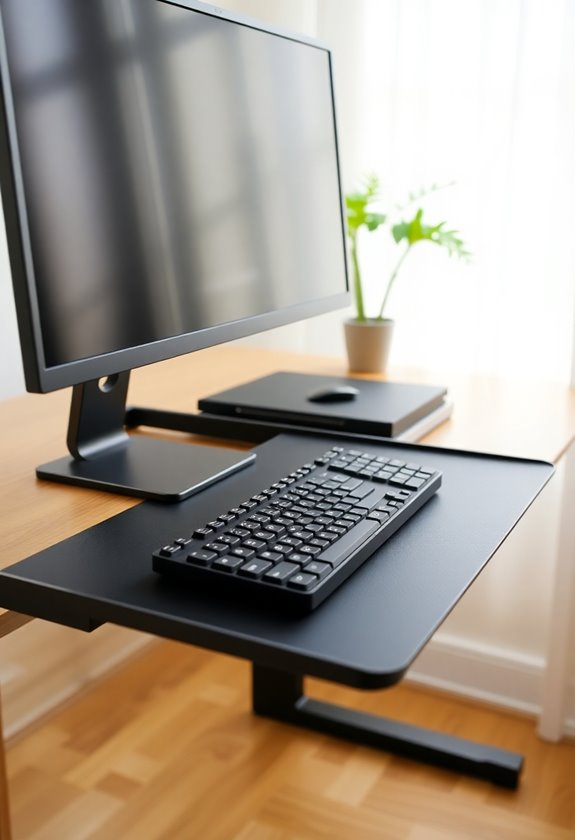
Once you've refined your keyboard tray and mouse pad setup, your monitor's position becomes the next key factor in creating a comfortable workspace. The monitor's height should align with your natural eye level, placing the top edge slightly below where your eyes naturally rest when looking straight ahead.
To achieve ideal monitor positioning, follow these key steps:
- Position your monitor 20-25 inches from your eyes
- Align the screen directly in front of your keyboard tray to prevent neck twisting
- Adjust the monitor's tilt to minimize glare and reduce eye strain
- Confirm your shoulders remain relaxed when viewing the screen
You'll want to use your monitor's adjustable arm or mount to make precise height adjustments, maintaining proper posture throughout your workday while keeping your wrists straight and elbows at 90 degrees.
Common Installation Mistakes
A successful keyboard tray installation requires careful attention to detail, as several common mistakes can undermine your ergonomic setup. When installing your keyboard tray, you'll need to focus on four critical areas to avoid discomfort and potential injury.
First, guarantee your keyboard height allows your elbows to maintain a 90-degree angle, with your hands resting just below elbow level. You'll want to position the tray with a neutral or slightly negative tilt, as positive tilt can strain your wrists. Don’t forget to drill pilot holes and properly align mounting points with your desk‘s underside, guaranteeing stability and longevity. Finally, be mindful of wrist support positioning – they shouldn't extend too far or cause awkward reaching, and you shouldn't rest heavily on them while typing.
Maintaining Your Keyboard Tray
To maximize your keyboard tray's lifespan and functionality, regular maintenance plays an essential role. You'll need to establish a routine that includes cleaning, inspection, and proper care of all components to guarantee smooth operation and prevent unnecessary wear.
Here's what you'll need to focus on:
- Check and tighten all screws monthly, being careful not to over-tighten them
- Clean the tracks and sliders with compressed air or a soft brush every two weeks
- Apply silicone spray or graphite lubricant to sliding parts every three months
- Inspect brackets and mounting hardware for stability during your monthly maintenance
Don't forget to add non-slip solutions like rubber feet or drawer liners to enhance stability, and always keep replacement parts on hand for quick fixes when needed. Regular maintenance will greatly extend your keyboard tray's life while ensuring ideal performance.
Frequently Asked Questions
Can Keyboard Trays Be Installed on Glass or Marble Desks?
You'll be thrilled to know that installing keyboard trays on glass or marble desks isn't just possible – it's easier than finding a needle in a haystack! You can safely mount keyboard trays using non-drill options like clamps or adhesive systems specifically designed for these surfaces. When selecting a tray, verify it has protective rubber pads and check your desk's thickness compatibility before installation.
How Much Weight Can a Typical Keyboard Tray Support?
Most keyboard trays you'll find on the market can support between 4.4 and 15 pounds, depending on their design and construction materials. You'll find that ergonomic models typically handle around 4.4 pounds, while standard track-mounted designs can support up to 15 pounds. If you're looking for a versatile option, clamp-on height adjustable trays offer a middle-ground capacity of about 11 pounds.
Will Installing a Keyboard Tray Void My Desk's Warranty?
Installing a keyboard tray may void your desk's warranty, as most manufacturers explicitly exclude third-party modifications from coverage. You'll need to check your specific warranty terms, since policies vary among different brands. If you're using the manufacturer's own keyboard tray or authorized accessories, you're likely protected, but installing unauthorized modifications could affect both your warranty coverage and any future claims.
Can I Remove the Keyboard Tray Without Damaging My Desk?
Studies show that 94% of keyboard tray damage occurs during improper removal. You can safely remove your keyboard tray by first determining if it's clamp-on or screw-fix. For clamp-on models, simply loosen the adjustment knobs and slide it out carefully, while screw-fix types require you to locate and remove all mounting screws with the correct screwdriver. Don't forget to support the tray's weight as you detach it to prevent desk scratches.
Do Keyboard Trays Work With Standing Desk Converters?
Most keyboard trays won't work directly with standing desk converters due to space limitations and mounting challenges. You'll need to look for specialized trays designed specifically for converters, which are typically more compact and use different mounting mechanisms. While some manufacturers offer compatible keyboard tray options for their converters, you can also consider clamp-on trays or platforms that attach to the converter's edge.


